John Betts - Fine Minerals > Home Page > Educational Articles > Digital Mineral Photography |
by John H. Betts, All Rights Reserved
Digital photography, the capturing of an image and storing in an electronic media rather than on film, is starting to become accessible to the average consumer. Camera prices are falling and image quality is improving. Compared to conventional 35-mm photography, there is no film or processing costs, and results are immediately viewable so a re-shoot can be made quickly if needed. Plus there are more and more applications where digital images are more convenient and cost effective. Mineral collectors can create online web sites of their collections to share with others, send images of minerals via email to potential traders, or print a catalog for their own home use. Commercial uses for digital images include advertising, online auctions like Ebay, and e-commerce web sites.
This article will review camera selection, techniques specific to digital mineral photography, and using image editing software. It does not address creative or stylistic elements in creating mineral photographs, nor address fundamental mineral photograph techniques. The reader is referred to Photographing Minerals, Fossils & Lapidary Materials by Scovil (1996) for learning more about these basic techniques.
There are three ways to create digital images: scan a conventional photographic print, scan a 35-mm slide, or capture the image with a digital camera (either digital video camcorder or digital still camera).
Table 1. - Comparison of methods of capturing digital Images |
|||
|
Digitally scan 35-mm slide |
Digitally scan 35-mm prints |
Photograph with digital camera |
step 1 |
Setup and photograph using 35-mm camera and slide film |
Setup and photograph using 35-mm camera and print film |
Setup and photograph using digital camera |
step 2 |
Process the slides (1 to 3 days) |
Process the prints at a one hour photo processor. |
Transfer digital image to computer (2 minutes) |
step 3 |
Scan the images with a slide scanner (5 minutes) |
Scan the images with a flat bed scanner (5 minutes) |
|
step 4 |
Transfer digital image to computer (2 minutes) |
Transfer digital image to computer (2 minutes) |
|
Equipment cost |
$300 (and up) digital slide scanner + 35-mm equipment |
$100 flatbed scanner + 35-mm equipment |
$500-700 for digital camera |
Average time per image |
15 minutes + time to get film processed |
15 minutes + time to get film processed |
5 minutes |
The final use of the images will determine which method is best. If the images will ever be used to make a presentation to a large group, then using 35-mm slides may still be the best way to make the initial image because they are much higher resolution. It is true, that digital projectors are becoming more prevalent and it is also possible to create slides from digital images. But it is advisable to start with 35-mm then scan to create digital images (high resolution to low resolution), rather than the other way around.
If the images will be reproduced in a catalog or book someday and the final image size will be larger than 3" then 35-mm may also be the best way to make initial image because of better photographic quality.
If you already have a large volume of existing photographs, 4x6" prints for example, then scanning the images with a flatbed scanner will be the easiest way to transfer the images to digital format.
However, if the final application is posting images of minerals to an online auction or e-commerce site, and a high volume of photos is anticipated, then capturing the images with a digital camera will be more cost effective and less time consuming.
The bottom line is the trade off between quality, cost and convenience. If you anticipate 100 images per year then either 35-mm slides or prints will suffice. If you anticipate shooting 50 images a week then convenience and time savings will be more important than the higher cost of a digital camera. The task of photographing a mineral collection of say 1000 specimens is not insignificant. Obviously, it pays to buy the best equipment for the job. It will save time, effort and ensure image quality. For the purposes of this article, focus will be on using a digital still camera, the most likely method used by mineral collectors/photographers. Much of the same applies to using digital video camcorders.
Digital image resolution is measured in pixels (short for Picture Elements). A pixel is an individual point of color in an image and is the equivalent to the film grain in conventional photography. It is expressed as a length x width number. Cameras are often sold as megapixel cameras meaning they capture one million pixels of information. The length multiplied times the width yields the total pixel count.
Image pixels are independent of the common specification used in printing known as DPI for dots per inch (or LPI for lines per inch). DPI/LPI have no relation to the image quality captured by the camera. They are a control of the printer and the size of the print image. As an example, a 600 x 300 pixel image printed at 300 DPI will output a 2x1" image on paper. The same 600 x 300 pixel image printed at 150 DPI will produce a 4x2" image. The content captured by the camera (600 x 300 pixels or 180,000 total pixels) and stored as the digital image is exactly the same in both cases, even the file size is the same. But the print size will be different. Print resolution of 300 DPI is minimum before print quality starts to degrade, 600 DPI is common on laser printers, and 1200 DPI is readily available.
The pixel count does effect how large an image is printed before there is apparent degradation. DPI has no effect on the inherent image quality of the digital image. This a major source of confusion and important to understand. The bottom line is the important measure of image quality is pixel count expressed as length x width ( i.e. 600 x 300 pixels). See Table 2. for the file and print size comparisons.
As a point of reference, a 35-mm Kodachrome slide captures the equivalent of about 1 billion pixels of information, which is why Fuji and Eastman Kodak is not too worried that conventional photography will ever disappear.
Table 2. - A summary of typical image and camera specifications and their equivalents: |
|||||||
Typical image resolutions: |
|
Total pixel count: |
|
Camera advertised as: |
Typical JPEG file size: |
Printed image size at 150 DPI: |
Printed image size at 300 DPI: |
640 x 480 pixels |
= |
307,200 pixels |
= |
300k pixels |
130 kb |
4.2x3.2" |
2.1x1.6" |
1024 x 768 pixels |
= |
786,432 pixels |
= |
786k pixels |
260 kb |
6.8x5.2 |
3.4x2.6" |
1280 x 1024 pixels |
= |
1,310,720 pixels |
= |
1.3 megapixels |
520 kb |
8.6x6.8" |
4.3x3.4" |
The answer is simple: as many as you can afford. The price of digital cameras is directly related to the resolution, and therefore image quality. But why buy a camera that makes images at 1280 x 1024 pixel resolution when a typical image on a web site or online auction is 300 x 400 pixels? Because of an artifact of digital image capturing devices called the edge effect.
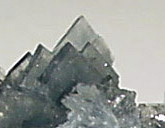
The edge effect (similar to Mackie Lines in conventional photography) grew out of the television industry as a way of artificially enhancing the apparent sharpness of a low resolution image. It creates artificially accentuated edges on areas of contrasting color or brightness. (See Figure 1.)
|
Figure 1. Enlarged portion of a digital image. Note the white fringe around the crystals and the exaggerated dark edges of the gray crystals. This is due to the edge effect inherent in digital imaging. Higher resolution cameras will minimize this effect. |
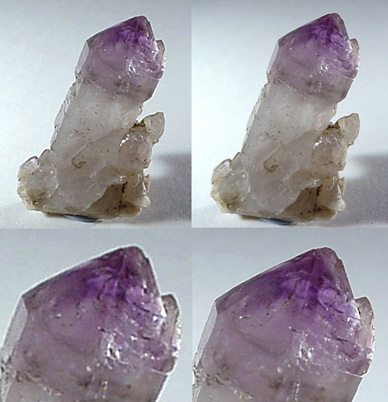
By capturing images at high resolution, then reducing the resolution using image editing software, the final image will look more natural and professional. See Figure 2 for a comparison of the exact same image capture at different resolutions.
Another reason to use a high resolution camera is unforeseen future needs. The Internet might be faster in the future allowing larger images to be sent, or you may want to print a catalog of your collection. Therefore, it is highly recommended to purchase a high pixel count camera, store images in a high resolution size for the future, and create image copies at lower resolution for final applications if required.
|
Figure 2. The same specimen photographed with a low resolution camera (left) and a higher resolution camera (right), with enlarged details of a portion of the photo below. Notice the white halo visible around the outside of the crystal on the left due to the edge effect and the sharper detail of the higher resolution image on the right. |
Camera Requirements
Digital cameras are getting better every day. Any specific camera recommendation made in this article would be obsolete as soon as it is printed because every camera manufacturer has several new digital cameras in the product development pipeline. Instead, discussion will focus on the minimum set of camera features recommended specifically for mineral photography.
Every digital camera has a basic lens, sometimes a zoom lens, built-in flash, automatic focus, automatic exposure meter and LCD viewfinder. However, when shopping for a digital camera look for the following features:
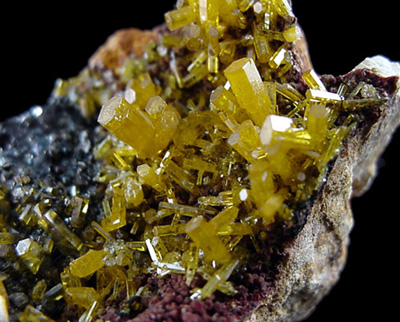
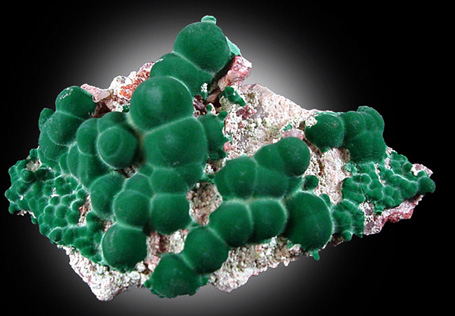
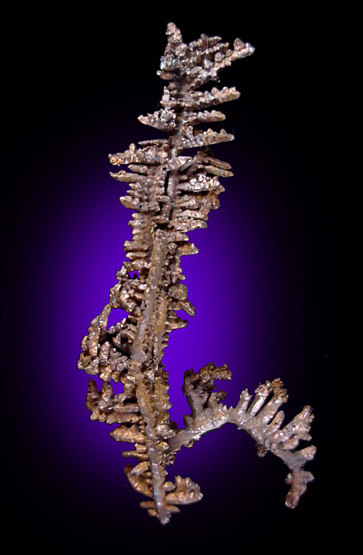
For photographing minerals, the camera should focus to a minimum of 1". This allows photographing thumbnail specimens or individual crystals on larger specimens (See Figure 3.). There are many cameras on the market that can focus to 1 cm (.4") without the need of any attachments.
A poor alternative is using a camera that permits attaching "close-up filters" which are diopter lenses that come in +1, +2, +4 strengths. By using them alone, or in combination, any value up to +7 can be obtained. But every mineral is unique, sizes and focus distance vary greatly. The hassle of switching filters for every specimen, is tolerable but time consuming. For the last year the author has used a camera that focuses continuously down to less than 1cm and finds it highly preferable to using to his previous camera that required close-up filters. Close-up focus is highly recommended as a fundamental requirement for a digital camera.
|
Figure 3. Close-up image of a 1/16 to 1/8" crystals. Any camera used for mineral photography should be able to focus to 1" minimum to capture this sort of detail, ideally without any additional attachments or filters. |
The camera should offer manual exposure compensation of plus or minus 1 stop minimum (plus or minus 1.5 stops is optimum). This allows the photographer to make fine adjustments in exposure. Many shortcomings in an image can be fixed later with image editing software, but if the exposure is not correct then the information will never get recorded properly and digital enhancement may not be successful.
All digital cameras have built-in exposure meters. These "averaging" meters measure the overall image to determine exposure. A camera with "spot" metering is recommended for mineral photography. This feature allows the photographer to meter a small area of the image to determine the proper exposure rather than averaging the entire image. This is important when photographing a dark specimen on an light background or a light specimen on a dark background. Often the spot metering is a separate "mode" that must be setup before using the camera.
Manual focus control is especially important for close-up photography where depth of field is shortened. It is also useful when the camera’s autofocus misbehaves for some reason and insists on focusing on the matrix or the background rather the crystals you are trying to capture. One shortcoming of digital cameras is the relatively small LCD viewfinder makes it difficult to tell whether the image is in focus. When in doubt take multiple exposures, varying the focus in each, to make sure there will be one good image.
All digital cameras come with built-in flash for general photo use. However, lighting control is important with mineral photography. The camera must have the ability to shut off the built-in flash. Simply covering up the flash with tape will not work as the camera’s automatic exposure system will likely overcompensate and produce a bad image.
Digital cameras consume batteries at a very high rate. Invest in an AC adapter if photographing more than 20 specimens at a time. The adapter will pay for itself in savings on batteries.
All digital cameras have a self timer. It is recommended to use the self timer for close-up images to eliminate camera vibration during exposure. Also, there will be times when you need both hands free to hold diffusers or reflectors. The self timer can be used the take the exposure while holding the props.
This seems obvious, but make sure the shutter release is located where it will be convenient. Imagine photographing a specimen up close, will fingers get in the way of lighting or is the shutter release around on the front where it is not easily located?
Every camera manufacturer uses a different way of storing the images once they have been captured. Some use inexpensive floppy disks, some use memory sticks, some use smart cards. None of these are perfect. Make sure to understand the cost for the media, special hardware required to read the media, and the transfer to computer process. Most importantly, run a trial to see how long it takes to capture an image and transfer it to your computer. All cameras are not equal in this respect.
It may be possible to skip storing the image on any media and transfer the image through a cable directly to the computer. While this may be a time saver, it is not always convenient to locate computer adjacent to the photo stage.
© John H. Betts - All Rights
Reserved

Please support our sponsor

© John H. Betts - All Rights Reserved